Aproveitem.

Hi, Harijan! Thanks for writing.
I looked at your art, and I have to say that you do have some talent and it would be a shame if you didn't pursue your dreams. I see promise in your work, but get some schooling!
I'm pressed for time, so I'm going to get right into critique.
You want to work on perspective, anatomy, and light and shadow, though you have a good start on most of those. Later you will want to start thinking about design and composition as well.
You are clearly drawing from your head. That's fine, to a point. It's how we all learn, and it is certainly an important part of the process. But there comes a stage at which you have learned everything you are going to learn that way, and actually risk developing bad habits if you continue to draw out of your head exclusively. Start drawing from life: get your friends to pose for snapshots, use magazine pictures, or better yet, draw your family while they are watching TV or reading, doodle your friends between rounds at your next D&D game, whatever. At the very least, use a mirror and pose yourself as you draw. I do it still from time to time, though I prefer to shoot models. You will learn so much faster and so much better. There is a connection between hand and brain that solidifies knowledge.
Start with life drawing classes; find a place that offers them (most art schools will have them on a weekly basis after-hours. If not, you might be able to arrange it with through them). In the meantime start researching a good illustration and design school (NOT a Fine Art course at a college; they are largely worthless).
Your anatomy is okay, but it is suffering from the fact that you are drawing out of your head. The trick to anatomy, it's simple: practice. Start with a good anatomy text. I highly recommend Peck's "Anatomy for Artists"; it's been an art school standard for years.. There are some very good books on animal anatomy out there, too. Visit your art supply store and find the book department. Every good art store has one. If yours doesn't, plan a visit to a better one in another city if you can. You may be able to find them online as well. " An Atlas of Animal Anatomy for Artists" by W. Ellenberger, H. Dittrich, and H. Baum, from Dover Press is very very good. I also started subscribing years ago to the Wildlife Fact File, a mail-order encyclopedia of sorts. Every month they send a package with four or five Fact File pages on specific animals, usually consisting of several good photos of the animal in its habitat. My set consists of about twelve volumes now, packed full. You would not believe how many different types of birds there are! I find them immensely useful. Sam and I used them a lot when we were concepting the creatures for Third Edition. Sam also had some college biology in which he learned a great deal about animal physiology in general. Also very useful. I also have an extensive "Swipe file" of magazine photos collected over the years, categorized and filed in file folders. The internet can be a great place to find photos of nearly any animal you need as well, though the quality is not always great.
The trick with animals, as with people, is knowing what's going on under the skin and fur. The anatomy of bone and muscle is extremely important. For example, most laymen will confidently state that a dog's knees bend backwards. Not so, of course. What we think of as a dog's knees actually corresponds to what would be our ankle or heel, with their foot corresponding to what would be our toes. A dog's knees are tucked up close to their bodies. When you understand that, your dogs legs will look more convincing. Understanding animals is key to making good monsters.
Use good reference when you draw. Drawing out of your head can be fun, but if you want to learn and draw well, life-drawing a must. It's an invaluable way to learn the subtleties of the human form (something that few can ever really master entirely), so I'm glad that you have a regular place to draw. At home, if you have a camera, take photos from which to draw. A digital camera can be a wondrous asset if you have access to a computer and printer. I also strongly recommend a book called "Drawing From the Right Side of the Brain" (I forget the author). It contains some amazing exercises for stimulating the part of your brain that sees things as they really are, and can help you break some bad habits that you have taught yourself when you were learning the standard, over-simplified symbols of How Things Look. Every first grader knows that a nose is an L-shape, or upside-down 7, for example. It's not true, obviously, but even talented artists will have set routines that they run when they are drawing an ear, say, or an eye, that may contain inaccuracies that escape the casual observer. The result is a face or figure that is drawn according to a list of symbols rather than a detailed observation of the reality, complete with light effects, shadows, perspective, and so on. Accurate observation is essential to a good drawing. If you always draw from your head, you will not exorcise those flawed routines.
I'm going to attach something that I have been meaning to put on the website. It's a mini-lesson in light and shadow. Read it, study the illustrations, and think about these qualities as you are drawing from now on.
Here it is:
________________________
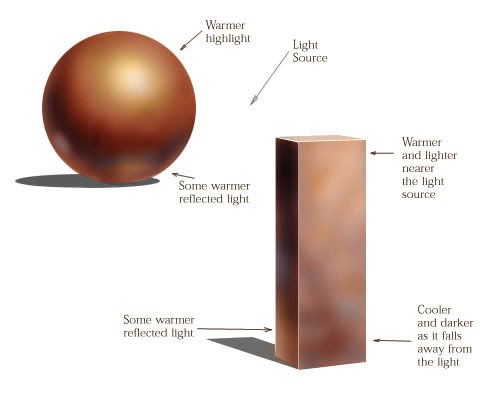
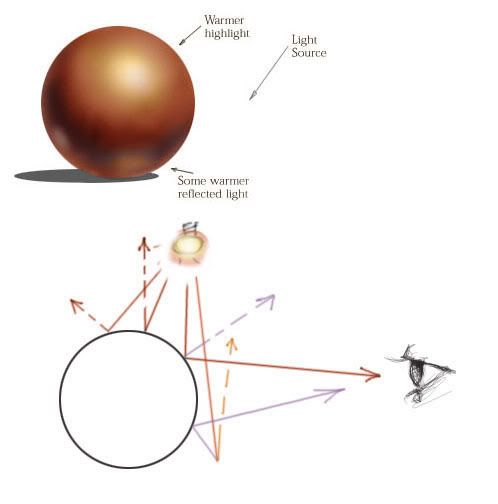
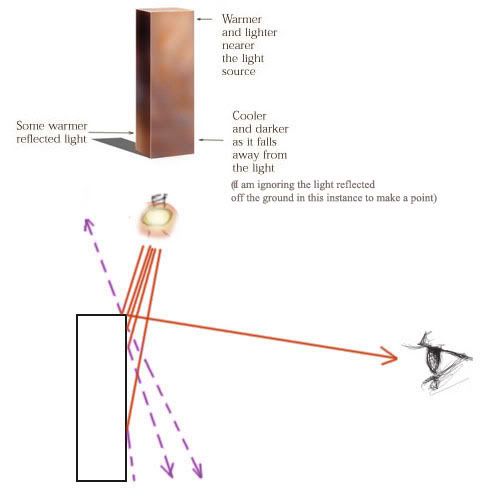
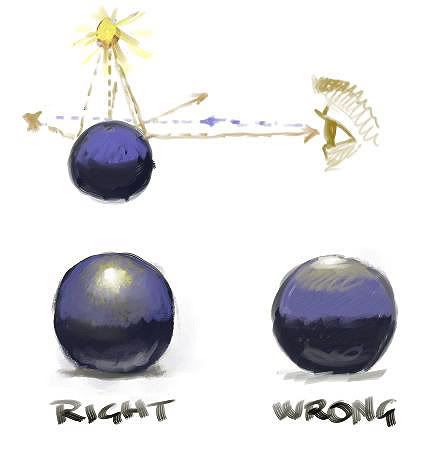
Here's a tip for shading: light acts like ping-pong balls. A particle of light hits a surface and bounces off at a predictable angle, like a billiard ball banking off of a side-rail. I'm attaching some little jpegs that demonstrate this. In the second and third, I'm showing you two things: the light that bounces directly into your eye, as a highlight (solid lines), and the light that doesn't, which is the ambient light (dashed lines). You can think of ANY surface as a mirror which throws light back. That's easy with a flat surface, because mirrors are flat. Round surfaces are otherwise no different. Light strikes the surface and bounces off most powerfully at an IDENTICAL, but OPPOSING angle. Just like a billiard ball. So, the light bouncing toward your eye– the only light you will see, obviously– will be strongest where it is coming off of that kind of bounce. It's relative to the placement of the light source and the location of your eye, in space. A highlight IS NOT strongest where the surface is closest to the light source. It is strongest where the angle of that surface is MOST LIKELY to bounce the light straight toward your eye. That is the red lines. The ambient light is the light that is bouncing off of irregularities in the surface, and it goes in every direction. There is light bouncing everywhere, all the time. We only perceive the light that happens to be bouncing to the exact spot where our pupils are. Some of it will bounce back toward another surface, then off of that second (or third) surface and into our eyes. That's reflected light, or fill light (the solid purple line in the drawing of the ball).
There will be a tendency for a surface to appear brighter toward the light source, but that is different than the actual highlight. Look at the drawing of the brick to see what I mean. There is a point of demarcation on the corner edge of the brick where the highlight is most likely, but the light that strikes the face of the brick as it falls away from the light is doing so at an ever increasing angle. This will be especially true where the light source is close. The more extreme that angle becomes, the less likely it is that the surface irregularities will bounce some of that ambient light toward your eye, thus the light appears to "fall away".
If you think of a surface as a mirror, the highlight will appear wherever that spot is that would have been a reflection of the light, were it an actual mirror. Make sense? Some surfaces are great at reflecting, like mirrors. Some aren't, like walls. But walls are still flat enough that there will be a "hot spot". Look at the walls where you are sitting right now and find the hot spot.
That's all you need to know about how light works to start studying it. Everything you draw or paint is either a flat or curved surface, and the rules will apply. Even water works that way, though transparency is another issue. Your job as you draw is to see the light bouncing. The better you know the volume and construction of the forms of the objects, the better you will understand how light bounces off of and onto those objects, so that is important too.
_____________________________
The other thing you want to work on is volume. That involves perspective as well as shape, so pay attention to that, too. That applies in many more ways than simply making sure that the two sides of the road converge on a vanishing point. Circles become ellipses as they turn away from you, until--edge-on, you might not recognize them as circles. What seem like straight lines really aren't. Perspective is inherent in everything you see, including anatomy.
There are numerous tricks, and they all have to combine seamlessly to create the illusion of space. There's really even more to it than just capturing a scene as a camera would, because a camera doesn't infuse the image with impressions and emotion or pre-suppositions. Cameras don't feel, they don't focus on one object then move to another, then back to the first, and so on. It's as much about what the mind chooses to see as what light the eye has captured.
You have a grasp of perspective, but i want to challenge your thinking a little bit:
If you've read my FAQ, then you know that I regard an understanding of perspective as essential. It's not complicated, really, but developing an instinct for it might take some time. I always saw it, I think, because even my earliest drawings have some basic acknowledgment that things recede, and that the floor is a plane, not just an imaginary line at the bottom of the picture. That doesn't mean that you can't learn it, but you may have to make it a focus. On any assignment you are given, insist from yourself that perspective be involved. Take a pad and pencil out on the campus and draw the architecture, with a mind toward seeing the vanishing points and observing the way parallel lines tend toward them. Observe also that in the real world, there are no straight lines. For example, if you stand in the middle of a street and look one direction, you see parallel lines converging on a vanishing point. If you turn and look the other way, you see the same thing. But if you look to either side, you see what appear to be straight lines, running parallel to each other. What gives? If they're straight, how can they converge on either side of you? That's because they may be straight in reality (disregarding, for the moment, that the earth they're laying on is curved, too), but from your vantage, they're curved. That's what's known as curvilinear perspective. In that scenario, the only line likely to be "straight" is the centerline of the road - the one you're standing on.
The human eye has a certain focal length; we tend to see only a portion of the environment at a time. And so we allow ourselves the luxury of believing that straight lines appear straight. But if you look at the parallel lines of floor and ceiling in the room where you are sitting right now, you will see the same thing; that the lines are actually subtly curved, that you live at the center of a fish-eyed universe. A line is rarely so perfectly situated within your field of view that you would actually draw it as a horizontal line, even lines that we know to be level. If you turn your head slowly where you are sitting, and concentrate on the lines and angles of wall, furniture, and floor as abstract shapes, not as things, and pay attention to how they shift in your sight, you will begin to understand it. You can look straight at a thing, say the monitor you're reading this on, and make the horizontal lines of top or bottom truly horizontal in your field of view. But turn your head just the tiniest bit, and they are no longer so.
A camera has to use a complex, bending-lens arrangement to keep all verticals in a shot vertical... but then you see serious distortion at the corners of the photo. You can see it in architectural magazines all the time. You can make the same distortion by laying out a perfect vertical and horizontal perspective grid with a vanishing point in the center, then draw a table down in the corner on the grid. It will look stretched and wrong, because it's an artificial perspective. This results from wanting to make every line in a grouping of parallel lines straight. Only one will be. The rest will converge toward it at either end, like the sides of a road converging toward the centerline you're standing on. Walk to the side of the road, though, and the side of the road is now the straight line, and the centerline is bent!. But look up, at the horizon, and the side you're standing on is now curved, too, while the horizon is straight!
Perspective is, literally, the view you see from wherever it is you are, depending on which way you are pointing the eyes in your head. It's dynamic and alive. it moves and changes as you move. Throw out all preconceived notions of things as they were taught to you as a child - vertical lines in architecture must be vertical lines on the paper and so on - and start seeing with your eyes the way things really are. This doesn't mean that you have to make every line curved, but if you are aware of the dynamic, you will be able to better compensate for it when you draw. It is something of a science, but it's a fairly simple one once you see it. Observation and practice will hammer it home.
The trick, then, is to apply that knowledge to artwork for people who believe that verticals must be vertical, and horizontals horizontal.
Look at Barfight, here:
http://www.toddlockwood.com/galleries/n ... ight.shtml
There are true verticals on either side, toward the top, in the corners of the room and along the back wall. I made them vertical because they are small and fairly insignificant, they are in the distance, and because in a horizontal painting they are not substantial anyway. Also, they are far apart, and if I were in that room looking at them, I would probably have to turn my head to look from one to the other. If I were looking straight at them, they would appear vertical, and if I'm not looking UP at them to any significant degree, lines parallel to them wouldn't bend much. Follow me? It's just like thhe example of the road and the centerline, only vertical instead of horizontal. If this were a vertical painting, and the room had a vaulted ceiling, those same lines would probably have had to start bending inward somewhat to satisfy my sense of perspective.
But if you look at the bar, on the right side, i've used some exaggerated perspective to make a dynamic, moving form of the bar top. It contributes to the action by not being straight and static, yet by observing the curvilinearity of the scene I can make it seem natural enough that it doesn't jar.
The rest of the natural perspective in the scene is obscured somewhat by the fact that all the tables and chairs are overturned or bouncing. But you'll note that I've paid careful attention to the perspective of individual planks in each table and so on. Perspective is always there, so you should always try to draw it right. There are no "tricks" or shortcuts to get around it with.
Now look at Streams of Silver:
http://www.toddlockwood.com/galleries/n ... lver.shtml
Again, I've left the verticals vertical, because it's a horizontal piece and to see this scene, were I there in person, I would probably have to turn my head to take it all in. In doing so, each column as I was facing it would be vertical in my line of sight. UNTIL I TURNED MY HEAD. The other columns to either side, if I were to concentrate on them while still looking at the center one, would indeed by converging upward. But human vision tends to be very centrally focused, and so we get away with little lies like these. However, the horizontal lines in the scene are curved. Look at the invisible line that marks the top of each arch as they recede into the distance: it's curved, if subtly.
Finally take a look at Crystal Rain:
http://www.toddlockwood.com/galleries/n ... rain.shtml
Even these amorphous gas bags have perspective. The ropes wrapped around the volume of the bags define circles or ellipses that are receding toward a vanishing point, even if they are imperfect circles. If you take care to be aware of the gentle change in definition of those circles, your drawing will convey the sense of scale more interestingly. If I were standing under that big gasbag, I would definitely see the perspective. On the more distant blimp it's less obvious (though definitely still there). That concept applies to faces, arms, legs, torsos ... on and on. Perhaps the most important aspect of perspective is the observation and application of ellipses.
Go do drawings of things with strong architectural lines. Think about all of that while you draw. Sit underneath a church and look up. Draw a really tall portrait of a building that you have to tilt your head upward to encompass fully - draw some curved guidelines lightly to help you get started, based on what you see. Challenge yourself and see what happens. I think you'll be pleasantly surprised.
Again, always be aware of is that everything exists in three dimensions, even a piece of paper. Objects have volume. Concentrate on the mass of an object, it's form and construction in the three dimensions. When you draw a thing, learn to see it's depth as well as its width and height. Some instructors say to draw "all the way through" the object, or to be as aware of the back side (what my 3-year old daughter called the "pretend side") as the side facing you. Picture the whole object front to back, even the parts you can't see. If you don't believe it's there, how can you draw the object well? Know a thing inside out--people especially. And don't forget that those forms have perspective, too. You might be looking directly at a person's face, but looking down at his shoes. Or if he's just kicked your ass, you might be looking directly at his boots and looking up at his face.
Don't worry about color yet-- you'll be ready soon. Think tone, light and shadow, form and volume. Draw from life every day. Keep at it! At least an hour a day. I'll bet that if you do that religiously, and keep all your drawings in a scrapbook or folder, you will see a dramatic change in no time.
There is a good resource available online: download the art texts of Andrew Loomis, for FREE, here:
http://www.fineart.sk/index.php?cat=1
Loomis was an illustrator and teacher of art in the forties and fifties. What most distinguishes his career is the legacy in these books. He was a
master teacher, and covers all the basics thoroughly, with terrific illustrations to boot. He's an amazing teacher. (note: you have to download the books , so it can be time-consuming, but I have the two best and can burn them onto a CD and ship them to you for $20.00 if you like. Go to my website and to the "Prints" section, scroll down for the Paypal window, enter "Loomis CD" and $20).
Good luck! Keep drawing!
Todd


 .
.